
🧷 Key Takeaways
- Press the (Power button + the Volume up button) to take a screenshot on an iPhone with Face ID.
- Press the (Power button + the Home button) to take a screenshot on an iPhone with a home button.
- Take a full page (long screenshot) by capturing an initial screenshot and tapping on the full page on the top right side.
- Edit screenshots using the built-in Markup tools on your iPhone. Crop, add annotations, and save them to Photos or iCloud Drive.
- Free and paid screenshot apps with additional features.
Have you ever encountered something on your iPhone worth saving for later? It could be a funny meme to share with a friend, a helpful tutorial to refer back to later, or a meaningful conversation you wish to keep as a memory.
The problem is – iPhones don’t have print screen buttons, but they do come with a surprisingly useful screenshot feature, to be honest.
Taking screenshots on an iPhone is easy and only requires pressing a few buttons. The process, however, may vary slightly, depending on your model.
This article will explain what buttons to press plus other easy ways to simplify your iPhone screenshot experience, whether you use a classic one or a new iPhone 15.
You’ll Learn
- How to take long screenshots, and edit them with built-in tools.
- Discover incredible third-party apps that offer additional functionality to take a screenshot on an iPhone beyond the default.
Let’s get started.
Take a screenshot on an iPhone with Face ID (iPhone X & later)
To take a screenshot on an iPhone without a home button, follow the steps below:

Step 1: Locate the buttons
Find the side buttons and put one of your fingers on the volume-up button present on the left side (assuming you are carrying your iPhone in the right hand) and your thumb on the power button present on the right side.
Step 2: Press and release quickly
Now to capture the screenshot, quickly press and release both the side button and the volume-up button simultaneously.
A prolonged press isn’t necessary at all (pressing the buttons for too long will result in an option to turn your phone off).
You’ll activate Emergency SOS if you keep holding. That’s not what you want! RIGHT? So, let’s do a quick press, OK?
Upon releasing the buttons, your screen will blink and flash white with a shutter noise.
Step 3: Look for thumbnail
You’ll then see a thumbnail image of your screenshot appear in the bottom-left corner of the screen. This indicates a successful capture.
View captured screenshots In the Photos App
Screenshots are saved to your phone’s Camera roll. To view it, tap on the Photos app, and go to All Photos on your device.
![]() Photos app > Albums tab > Recents/Media Types (Screenshot Section).
Photos app > Albums tab > Recents/Media Types (Screenshot Section).
List of iPhones with Face ID
Face ID-equipped iPhones are listed below.
- iPhone 11
- iPhone 11 Pro & 11 Pro Max
- iPhone 12 & 12 Mini
- iPhone 12 Pro & 12 Pro Max
- iPhone 13 & 13 Mini
- iPhone 13 Pro & 13 Pro Max
- iPhone 14 & 14 Plus
- iPhone 14 Pro & 14 Pro Max
- iPhone 15 & 15 Plus
- iPhone 15 Pro & 15 Pro Max
Take a screenshot on an iPhone with Touch ID (iPhone SE 2nd and 3rd generation, iPhone 8, 7, 6s, etc.)
To take a screenshot on an iPhone with a home button, follow the steps below:

Step 1: Locate the buttons
This time, we will press the power button (present on the right side) along with the home button (present below the screen).
Step 2: Press and release quickly
Quickly press and release both the power button and the Home button simultaneously on hearing the shutter noise and screen blink with the white flash.
Step 3: Look for thumbnail
Similar to Face ID iPhones, a screenshot thumbnail will appear in the bottom left corner of your screen, confirming your capture.
Once you’ve taken a screenshot, tap to open it if you want to edit or share it.
View captured screenshots In the Photos App
Don’t worry if the thumbnail doesn’t show up or disappear right away before you open it.
You can find the screenshot following the steps below:
![]() Photos app > Albums tab > Recents/ Media Types (Screenshot Section).
Photos app > Albums tab > Recents/ Media Types (Screenshot Section).
List of iPhones with Touch ID
- iPhone SE (2022)
- iPhone SE (2020)
- iPhone SE (2016)
- iPhone 8 Plus
- iPhone 8
- iPhone 7 Plus
- iPhone 7
- iPhone 6s Plus
- iPhone 6s
- iPhone 6 Plus
- iPhone 6
- iPhone 5s
What if the home button doesn’t work?
If your home button doesn’t work, or you find pressing buttons at the same time challenging, you can still capture screenshots on your iPhone using the assistive touch functionality.
AssistiveTouch is an iOS accessibility feature you can use to perform various tasks, without pressing buttons or swiping.
Here’s how to use the AssistiveTouch feature:
AssistiveTouch to capture a screenshot on iPhone
Step 1: Enable AssistiveTouch
Go to your iPhone Settings.

Step 2: Accessibility
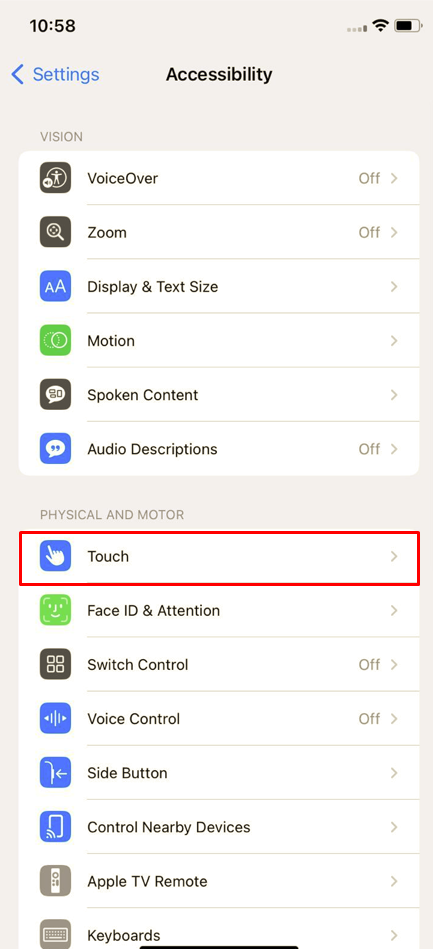
Then tap on “Accessibility.”

Step 3: Touch
Tap on “Touch” under the “Physical and Motor” section.
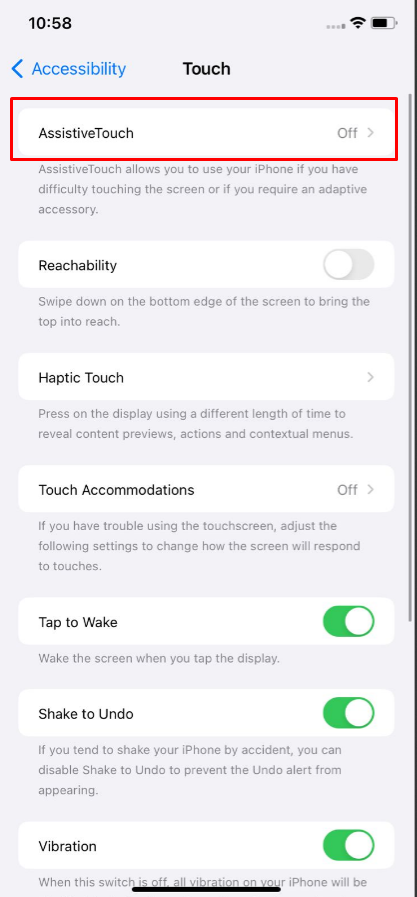
Step 4: Assistive Touch
Tap on “AssistiveTouch.”
Step 5: Turn on AssistiveTouch
Toggle the switch (present at the top of the screen) to enable AssistiveTouch.
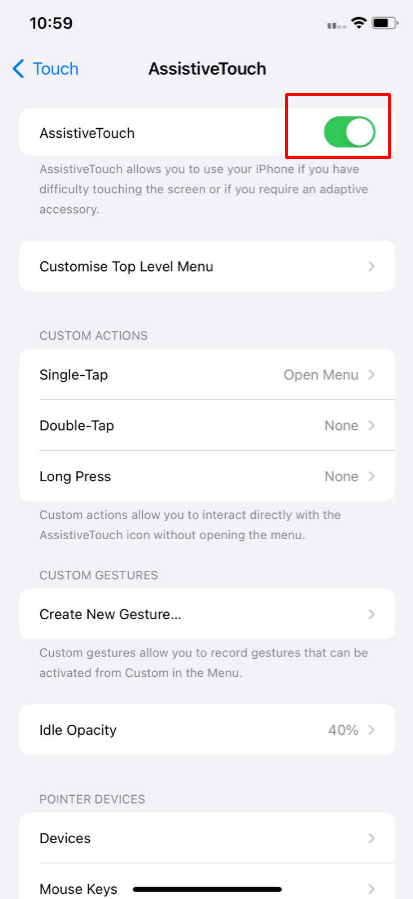
The AssistiveTouch button will appear on your screen, appearing as a group of faded, interconnected circles.
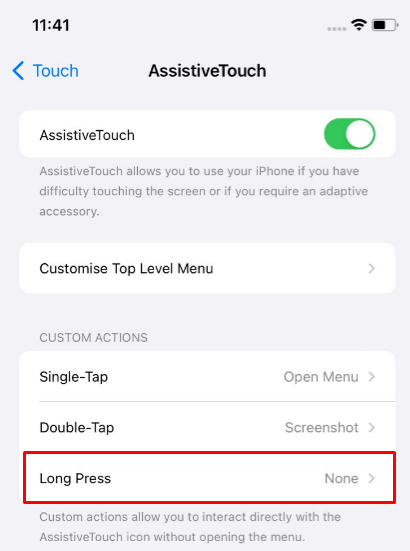
Now that AssistiveTouch is enabled, it’s time to set up the ability to take screenshots.
AssistiveTouch offers multiple screenshot options, so we’ll cover only the easiest ones here.
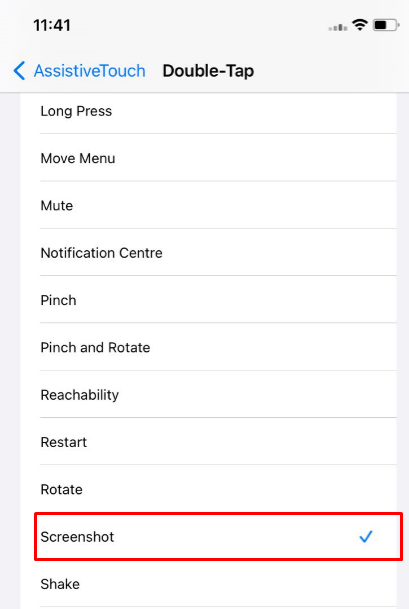
Step 6: Tap on double-tap or long-press
Touch on double-tap and select the screenshot option from the system.
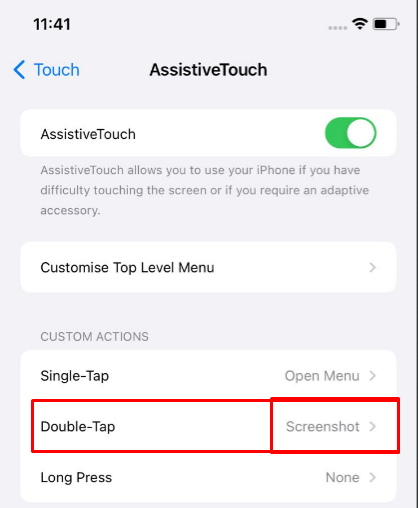
The AssistiveTouch button will take a screenshot every time you double-tap it.
Long-Press Option
Tap on long-press, and select the screenshot option from the system.
The AssistiveTouch button will take a screenshot every time it’s long-pressed. You can then find the screenshot captured in your Photos app.
Take a screenshot on an iPhone with Touch ID and Top Button (iPhone SE–1st Generation, iPhone 5s, etc.)
Step 1: Locate the buttons
Older iPhone models, such as the iPhone SE (1st generation), are equipped with a top button instead of a side button. The home button, however, is located below the screen.
Step 2: Press and release quickly
Press and release both the Top button and the Home button simultaneously to take a screenshot on iPhone SE and older phones.
Step 3: Look for the thumbnail
A screenshot thumbnail will appear momentarily in the bottom left corner, similar to the other models.
How To Edit Screenshots On iPhone?
Once you’ve taken a screenshot, use the built-in Markup tools on your iPhone to edit it:
Step 1: Tap on the thumbnail preview
Tap on the thumbnail preview and your screenshot will appear in its intuitive editing window, where you can crop or add annotations.
Step 2: Edit & crop
If you want to save only parts of a screenshot, crop the handles so the portion you want to keep is enclosed within a box.
Use the standard pinch-to-zoom gesture to zoom in on a portion of your screenshot.
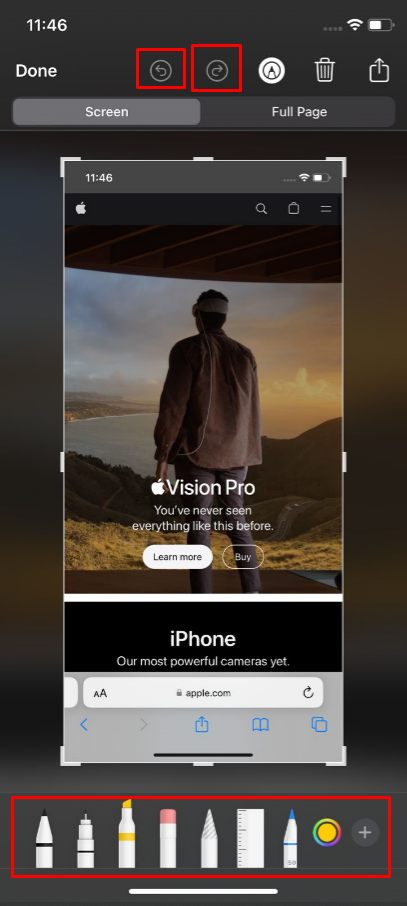
Step 3: Add markup or annotations
Add markup or annotations to your screenshot using your finger. You can find a variety of annotation tools at the bottom of the editing screen.
The top of the screen also provides Undo and Redo buttons so you can go back and fix errors you made while editing.
Step 4: Tap done
Once you’re done editing, tap Done in the upper-left corner.
Step 5: Save
You can then save the image to your Photos library or your iCloud Drive depending on your preference. Tap Delete Screenshot if you’ve decided not to save it.
How To Take Long Screenshots On iPhone?
Do you know you can take screenshots of an entire webpage or conversation that extends beyond a single screen?
Fortunately, your older iPhone models support this feature as well.
NOTE: This feature is only supported by the Safari browser and is available only for screenshot sources with more than one page of content, so you’ll have to be quick.
Here’s how to take long screenshots on iPhones (iOS 13 and later) that include non-scrolling content:
Step 1: Capture the initial screenshot
Take a screenshot as usual (of the visible portion of the content) by following the steps mentioned above for your specific iPhone model.
Step 2: Tap on the thumbnail preview
After taking an initial screenshot, you’ll see a preview thumbnail appear in the bottom left corner.
Tap to open the thumbnail preview before it disappears.
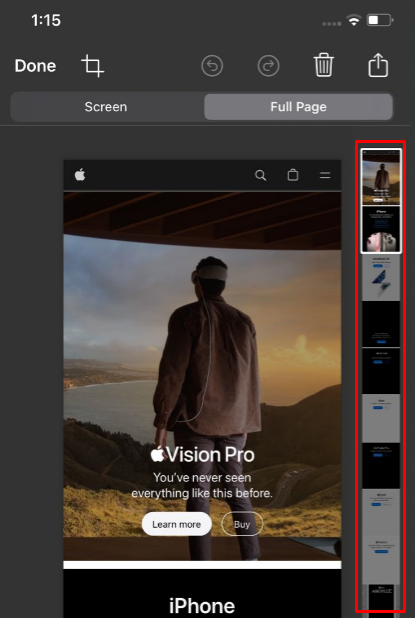
Step 3: Look for the full-page option
As soon as you tap on the thumbnail preview you’ll see the captured screenshot with 2 options on the top.
- Screen
- Full Page
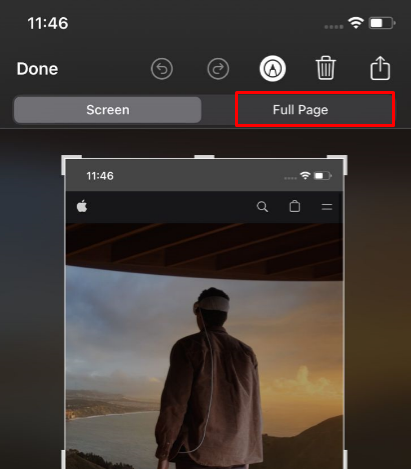
Tap on the Full Page and you’ll see a preview of the pages appear to the right of the screenshot with the initial screenshot into one long image.
Step 4: Tap done
Tap done, and you’ll have different options to save your captured screenshot, such as Save to photos, Save to files, or Save to quick notes.
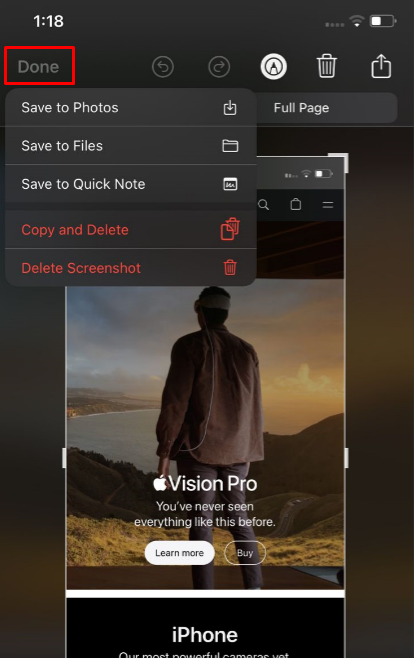
Save wherever you want and you’re done.
Third-Party Screenshots Apps For iPhone
The App Store features a number of free and paid screenshot apps with added features. Here’s a quick look at some options:
Free screenshot apps for iPhone
DS Screenshot
DS Screenshot is a free screenshot app for iOS devices that makes capturing screenshots super simple. Whether you’re an app developer, marketer, or blogger, you need this app. Simply press Power + Home on your phone to take a screenshot.
Awesome Screenshot for Safari
Awesome Screenshot is another amazing free app that works as a screenshot extension for Safari on iOS 8. Also provides a quick and easy way to edit screenshots.
You can capture screenshots in Safari, either full screen or selected areas, add annotations, save them, and share them with others.
Zappy By Zapier
Zappy offers business-level screenshot solutions. The tool is currently free because it is still in development and being market-tested.
With this platform, it’s quick and simple to make GIFs, take video captures, and edit them.
Takes minutes to install. The app integrates seamlessly and lets you record and capture all types of activity.
Zappy is a great app if you already use Zapier and have an iOS device.
Paid screenshot app for iPhone
Brosix
Brosix makes it possible to communicate and collaborate in real-time across multiple devices, with features such as screenshots.
Whether it’s a conversation, instant message feed, contact list, or other area of the screen, you can screenshot whatever you want.
The “screenshot” icon on the app makes it easy for you to share them with other users. If administrators wish, they can disable certain features for users, or even disable screenshots entirely.
Ideal For
Ideal solution for leaders seeking a tool to keep tabs on with unlimited file sharing and management features.