
🧷 Key Takeaways
- Press and hold Shift + Command (⌘) + 3 together to capture your entire screen.
- Press and hold Shift + Command (⌘) + 4 together for a partial screenshot.
- Press and hold Shift + Command (⌘) + 4 and then the Space bar to capture a specific window.
- Press and hold Shift + Command (⌘) + 5 together to open the screenshot app with multiple options.
- Press Shift + Command (⌘) + 6 together to capture anything on your touch bar.
- Best free screenshot apps for Mac – Skitch by Evernote and Lightshot.
- Best paid screenshot app for Mac – Cleanshot X.
Those who have just bought a brand-new Mac or have switched from Windows and are struggling to take a screenshot on a Mac might feel a little lost.
Although Mac doesn’t feature a dedicated Print Screen key like Windows, taking screenshots is pretty easy considering MacOS unique features.
Unfortunately, these features lurk behind keyboard shortcuts that are far from obvious.
Good news is – this step-by-step guide covers quick and easy ways to take a screenshot on Mac using keyboard shortcuts & 3rd-party apps.
Whether you are looking to capture the entire screen, a window, or simply a portion of it, this guide can definitely help.
You’ll Learn
- How to take high-quality screenshots on Mac, edit, crop, or even delete them in any case.
- How to capture the entire screen, a window, or a selected portion of it.
- Mac screenshot shortcuts.
- How to take a scrolling screenshot on Mac.
- How to retrieve screenshots on Mac.
- Troubleshoot if screenshot features don’t work.
Let’s get started.
Take screenshots on Mac (Using Keyboard Shortcuts)
Taking screenshots on Mac wasn’t this easy, thanks to macOS’ built-in options – with only 3 keyboard shortcuts you can capture screenshots quickly and conveniently.
The feature set is limited but works well if you just want to grab a screenshot quickly.
Shortcut #1: Cmd-Shift-3 (To Capture Entire Screen)
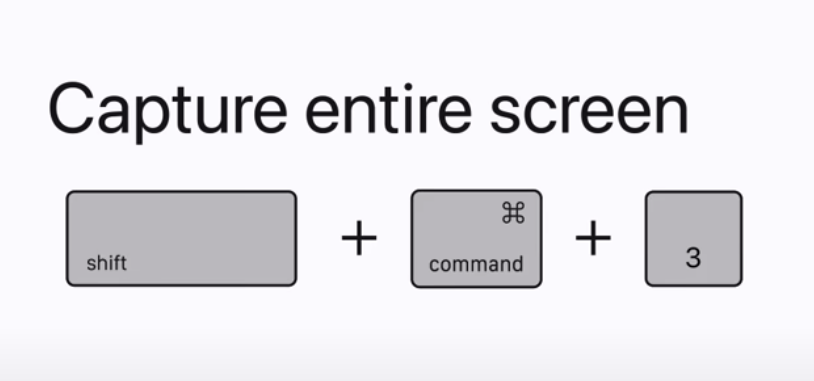
- Press and hold Shift + Command (⌘) + 3 simultaneously to capture your entire screen.
- Normally, the screen will flash or change before returning to normal while taking a screenshot.
- Wait for a moment after which your Mac will capture the screenshot and save it as a PNG file on your desktop named Screenshot, marked with the date and time of the capture.
- Following the capture of a screenshot, a thumbnail preview will appear in the bottom-right corner of your screen.
- Click this thumbnail preview to edit or share or wait until it appears on your desktop.
Shortcut #2: Cmd-Shift-4 (For Partial Screenshot)
In some cases, you may want to capture just a portion of your screen.
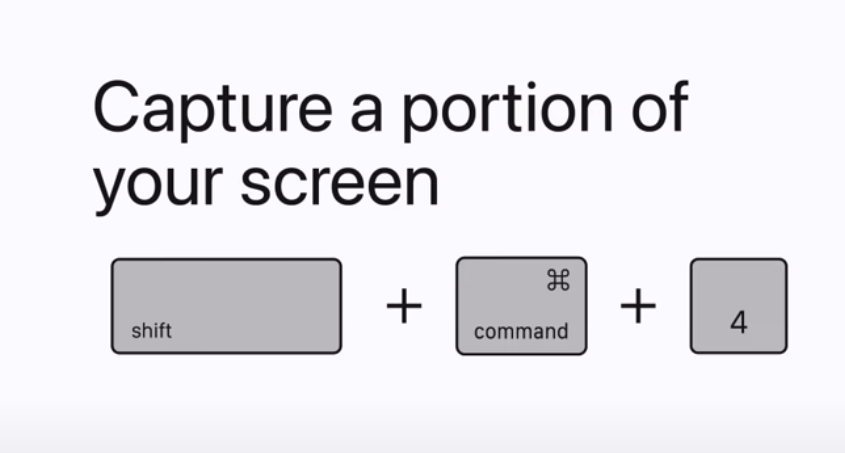
- To do that, press and hold Shift + Command (⌘) + 4 together to turn your cursor into a crosshair.
- Place the crosshair where you want to start the screenshot.

- Click & drag to select the portion you wish to capture.
- The moment you release the mouse button or trackpad, it takes a picture of that particular part. Press the “Escape” key if you intend to cancel the screenshot.

Once you have hit Cmd-Shift-4, you have a number of other options:
Shortcut #3: Cmd-Shift-4 With Spacebar (to capture specific window)
To capture a specific window, such as an application or a browser window:
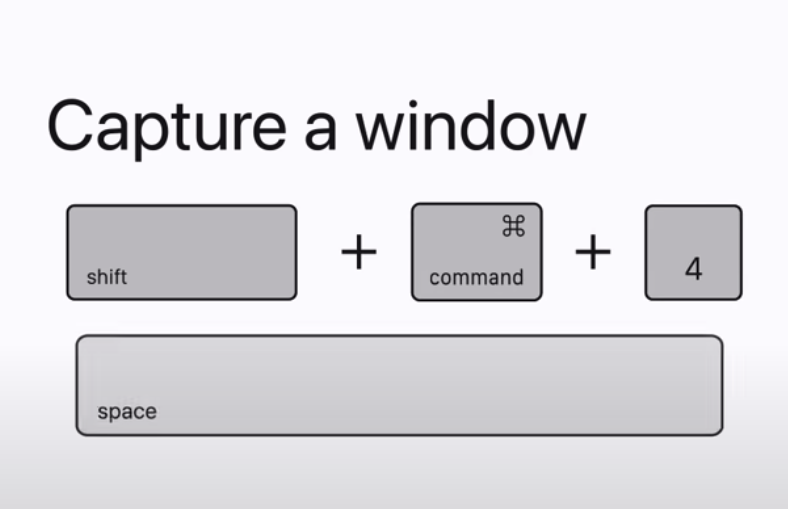
- Press Shift + Command (⌘) + 4 and then the Space bar.
- This will change your cursor to a camera icon.
- Move the camera over the window you want to capture, which will become highlighted to indicate its selection.
- Now all you have to do is Click, and your Mac will take the screenshot making a shutter noise.
This method captures screenshots with a white border and drop shadow surrounding the window.
To lock in the shape & size (Press and hold the spacebar)
- After dragging the crosshair to highlight an area (before releasing the mouse button or trackpad) “Press and hold the Spacebar”.
- This locks in the shape and size to prevent it from changing.
- You can reposition the box anywhere on the screen.
- Now release the spacebar to take your screenshot.
To adjust the height and width (Press and hold the shift key)
Without releasing the mouse button, release the Shift key and hit it again to reposition the right edge of your selection area. You can toggle between moving the bottom edge and right edge by keeping the mouse button or touchpad engaged and pressing the Shift key.
- After dragging the crosshair to highlight an area (before releasing the mouse button or trackpad) “Press and hold the Shift key”.
- This allows you to adjust the height and width of the box.
- Toggle between moving the bottom edge and the right edge. Keep the mouse button or trackpad engaged by pressing the shift key.
- Now release the mouse button/trackpad to capture the screenshot.
Shortcut #4: Cmd-Shift-5 (For Multiple Screen Capture Options)
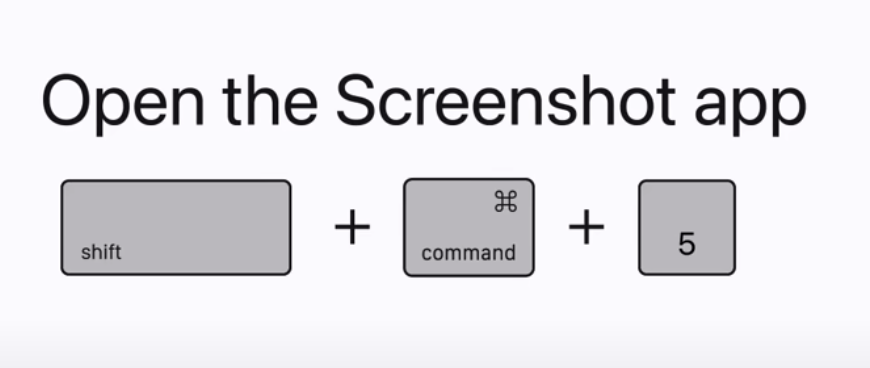
Press Shift + Command (⌘) + 5 simultaneously to open the MacOS native screenshot app with multiple screen capture options at the bottom of your display.
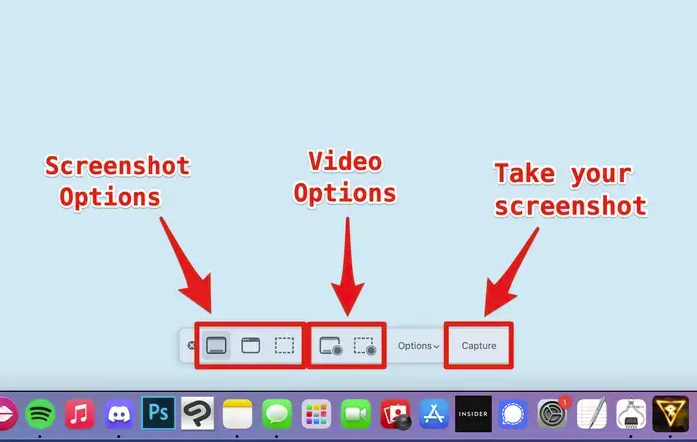
Source: Business Insider
Multiple screen capture options exist. You can:
- capture the entire screen
- A window
- A selection of your screen
- Record your entire screen
- Record a small portion of your screen
Drag the screenshot toolbar to move it around, if necessary.
Buttons on the left side let you capture a still image on your Mac.
The next 2 buttons are for video recording.
Screen Recording On Mac
- Using 2 video recording options, you can record your entire screen or just a part of it. These options are represented by a big dot with a thin circle.
- Choose the appropriate screen recording option and click ‘Record’. Click ‘Stop Recording‘ from the menu to end the recording. You can also use the keyboard shortcut Command(⌘)-Control-Escape.
- On the right, you’ll find the options button. You can click the “Options” button to change settings such as the location to save captures (Desktop by default), the image format (PNG by default), and whether or not to display a floating thumbnail or record mouse movements while recording.
- The X icon on the left closes the screenshot panel, or you can just press Escape to close it.
Shortcut #6: Cmd-Shift-6 (To Capture Touch Bar)
Press Shift + Command (⌘) + 6 together to capture anything on your touch bar.

This shortcut will capture a wide skinny screenshot of everything on the Touch Bar instantly (on MacBooks with Touch Bars).
Where To Find Screenshots?
By default, screenshots are saved to your desktop as PNG images with the name “Screenshot” accompanied by a date and time.
- Use Spotlight Search: Try using Spotlight Search, in case you don’t have them on your desktop.
- Use Finder App: Try using Finder App that will allow you to browse for screenshots, directing you to the specified save location (Desktop by default).
macOS Mojave and later versions have an options menu in the Screenshot app that you can use to change the default location of screenshots.
How To Take A Scrolling Screenshot On Mac?
Mac built-in functionality lacks scrolling screenshot capability which is why your captures are limited to what is visible on your screen.
Want to capture a full webpage or any form of scrolling content?
Try CleanShot X for taking full-page screenshots on Mac. Here are some other solutions:
Best Screenshot Apps For Mac
While the built-in screenshot options on macOS meet the needs of most users, third-party apps offer additional features and functionality.
Skitch By Evernote (Free)
Skitch by Evernote is a free and easy-to-use tool that works much like Apple’s Mac screenshot tool for screenshots.
The program allows you to annotate, resize, crop, as well as add shapes, lines, arrows and watermarks to screenshots.
Note: Skitch doesn’t have an erase feature.
LightShot (Free)
You can’t go wrong with LightShot if you’re looking for a free screenshot app for your Mac.
Simple and intuitive, it captures any portion of the screen quickly and meets all the essential screenshot requirements without being overly complicated.
You get the option to share screenshots directly to social media and add quick annotations.
Cleanshot X (Paid)
Those who want scrolling screenshots on Mac will find this tool useful.
Cleanshot X is the only tool that combines advanced screenshot options with screen recording functionality.
An intuitive UI that integrates seamlessly with macOS.
It has all of the features one would expect from a best screenshot/screencast tool – 10GB of storage, scrolling screenshots, text recognition, and a self-timer you name it.
There is a free version of CleanShot X with basic features, whereas the paid version costs $29 (one-time payment) or $9.99/month per user.
How to crop a screenshot on Mac?
After capturing a screenshot, you may want to crop it out on Mac to remove unwanted areas. It’s pretty easy with “Preview” – a native macOS application you can use to view and edit.
- Select the area you want to keep by clicking and dragging your mouse.
- Go to the “Tools” menu and select “Crop”. Preview will crop the screenshot based on your selection.
Resize Screenshot
To resize a screenshot on Mac, use the “resize” option present in the top menu or you can adjust the image dimensions in the inspector pane.
Annotate Screenshot
Click the toolbar icons to add arrows, lines, shapes, text, and signatures to your screenshot. You can also change their color, size, and opacity.
How To Delete Screenshots On Mac?
Treat screenshots like any other file on your Mac in case you have accidentally captured a screenshot that you don’t need.
Simply drag the screenshot file to the Trash icon in the Dock, or select the screenshot and press Command (⌘) + Delete to move it to the Trash.
Press Option + Command (⌘) + Delete to delete the selected screenshot permanently (without moving it to trash).